The ODRVM (go pro clone) has been working out pretty well on the Piranna scooter, either mounted directly on the handle or using my camera tray (below). However, Dive-X sells a compass and mount for the P1 that is really nice but a tad expensive. As I already had my aluminum go-pro mount for the sola light, I figured I could add an extension to allow me to mount my Suunto SK-7 compass as well. I have tested it now on two dives and it works great.
I was diving with a MUVI high definition video camera from time to time. The MUVI was a 1080p or 720p go-pro clone that came with an underwater housing. On a recent series of dives, the housing started to leak, then fully flooded, ruining the camera.
Now that I had a scooter with a go-pro mount for taking video, I wanted something similar to a go-pro but at much reduced cost. I found the ODRVM to be a highly rated go-pro clone capable of 1080p and 720p but costing $85 instead of hundreds like the 'real' go-pro (200-600!). It came with an underwater housing as well as many go-pro compatible mounts, so looked to be ideal.
I have now done several dives using the Piranna 1 and the ODRVM go-pro clone to take video of the dive. The results have been less than stellar due to the darkness of depth and the overall turbidity. On the one hand it's kind of cool to see video that's dark with a slash of light whenever I use my 18W HID light, but on the other hand it would be nice to see what I'm seeing, especially in close-ups.
The difficulty is the go-pro mount on the P1 is a single female mount, and the go-pro system supplies a single male mount with the underwater housing. How to attach a light to this set-up? On the surface, and in caves, many people buy helmets with multiple go-pro mounts and attach small lights to the helmet above the ears. This is not the direction I want to go with diving, the ODRVM and the P1
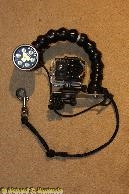
Instead, I devised a camera tray much like a photo camera tray to hold the camera and loc-line for the video light. I used a small piece of aluminum stock which I cut, smoothed and drilled. I then mounted the loc-line base, a female go-pro mount for the camera, and a male go-pro mount to attach to the scooter. I think it looks pretty good, but the telling will be when I test it on the next scooter dive. It may not do much when scootering in the dark depths, but close-ups should be much better.
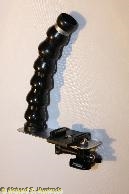
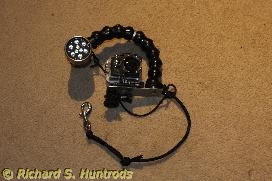
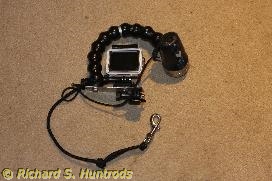
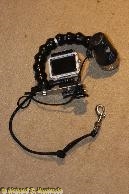
My current underwater photography system is based on the Canon A570 IS point-and-shoot digital camera paired with the appropriate Ikelite housing. I built my own custom tray arm out of a bar of stainless steel, added my necessary security clips and bungees, and then mounted some 3/4" loc-line (flex line) to hold a Sola 1200 video light. The entire system is very portable, has a nice weight underwater, and accompanies me on every dive with the exception of teaching dives. I absolutely love it.
Photos are taken using a combination of the on-camera flash (with Ikelite diffuser in front) plus the Sola 1200 as either fill-in light or complete light. Videos are easy with the Sola as well.
However, seeing the resolution from other's recent photos, plus the graininess in my videos compared to the HD options available, I came to realize that having used this rig since 2007 perhaps it was time for an upgrade.
The primary criteria were lower cost, higher resolution stills, and HD video. Cost is an issue. A housing for a DLSR will run $1500 for the least expensive, without ports or domes. Even a basic DLSR 'ready to dive' housing will cost around $2000. In addition with a DLSR you will require a minimum of one decent powered strobe, again coming in over $1000. A good DLSR rig really should have two strobes, plus arms and accessories. Even keeping the Sola 1200 for video meant an outlay of $3000 to over $4000 for the housing and strobes. All this and the camera is not included.
I tried looking at the newer mirrorless or 4/3 cameras, which are awesome - but again the housings are around $1500 and you still require ports and all the other stuff. So these cameras, while nice, are really just a different way of spending your DLSR money in my opinion.
So, without that kind of cash, point and shoot was definitely going to be the way to go. Point-and-shoot housings are anywhere from a few hundred dollars to just over $1000, and that includes everything to take the camera underwater. You still have to decide on lighting, but that's a different set of decisions.
Once the housing / camera format has been chosen, the way I approach the decision is to find the best camera for my dollar, feature for feature. Check the camera against available housings to ensure you can take the camera underwater, and you are done.
Choosing a camera is really a very personal decision. What one person loves another does not. Brand loyalty can play a huge role in final selection for most people. While all brands are probably excellent in one way or another, the realy choice comes down to what one person wants and what camera best fills that desire. I am a Canon camera person for many years now. Most of my film cameras are Canon, as are all of my current digital ones. I've tried Nikon (an early digital), but was not really happy with it. So all things being equal, I'll choose a Canon over another brand. After several months of reading websites, forums and such, plus reading about how various housings worked out for people, I ended up with a very short list of cameras that people raved about. One was the Canon G16, the other was the Sony RX100 II. While the Sony had higher resolution, rave reviews and better video options, the clincher for me was the Canon had better macro capability without adding macro lenses. Since most of my photography is macro, that really sealed the deal.
As mentioned above, the macro capability was the deal maker for me choosing the Canon G16. Once I started shopping, I was also very pleased to see the G16 was on sale for several hundred dollars less than the Sony. I'm sure the Sony is in many respects the better camera, but as various comparison and rating sites said: the Canon was always their second choice and an excellent camera as well. Since I wanted the macro, that made it my number one choice.
I purchased the camera a couple of days ago, and am very impressed with it so far. I has numerous options and features, but a couple of things that already stand out for me with respect to underwater photography are: it has excellent low light capability, both in terms of available ISO, speed and lens aperatures; it can focus quickly in regular and macro mode in low light situations; and it offers 1080P by 60fps high def video. Coupled with a 64 gig fast SD card, it can hold pretty much more photos and video than I am likely to take on any days diving.
Like Canon cameras, I really like the housings made by Ikelite for point-and-shoot cameras. I've had my current housing since 2007 and it's never had any issues or problems in all that time, and I dive with it almost every week.
Ikelite offers two housings for the Canon G16, one features a dedicated TTL wired connector, while the other does not. The non-TTL housing is cheaper and does have plug-in spots for fibre-optic strobe cables. If you buy a strobe with a slave trigger, it does provide a measure of TTL control. However this is not the same as a wired TTL strobe for flexibility and reliable flash triggering.
At first I was going to choose the non-TTL housing to save the money, but looking more closely and playing with the camera, I decided the on-camera flash might not be the best choice this time around. So in the end I decided to purchase the TLL housing, together with a small strobe, arms and sync cable (see below).
There are not may strobe choices from Ikelite. I could go with Inon or Sea-and-Sea, but I decided since this was my first foray into underwater strobes, I would prefer to go with one manufacturer and avoid any potential compatibility issues.
Ikelite does not offer a large choice of strobes these days. The DS-51 is their entry-level small strobe, and the DS-161 is their powerhouse model. The small strobe is about half the price of the larger one, and does not have nearly as much power. However, it is smaller and lighter. Given the type of photography I do, it seemed the smaller strobe might actually be the more appropriate choice for me. Certainly it would be a fine entry level strobe no matter what.
The smaller strobe offers true TTL syncronization via the cable (compatible with the TTL housing), and it's small size means that when I'm taking a photo of some small critter in an opening in the rock, the strobe won't be too large to get in close with my camera. Overall, I'm pleased with my decision.
Ikelite offers two strobe arm and sync cord options. Both feature the coiled sync cord which is good for not snagging. One kit features aluminum strobe arms, the other 3/4in loc-line (flex line). At first I could not decide, but then I figured I already use loc-line for my Sola 1200, so I'm familiar with that, and would therefore like to try the more tradional strobe arms that most others are using.